• Skip to main content

Make Bread

A bread blog for home bakers

  • Bread
  • Pizza

Bread Pictures

16.12.18 By nick 1 Comment

Greek Feta Pull Apart Bread – Step By Step

This pullapart bread is so easy to make!  Once in a while you get a little creative in the kitchen.  Either because you’re short on time and just make things up as you go or because you don’t have the right ingredients so you just toss things in and hope things work out. But once in a while someone sends you a recipe tip that stirs up the imagination and you just go for it.

greek pull apart bread tutorial collage

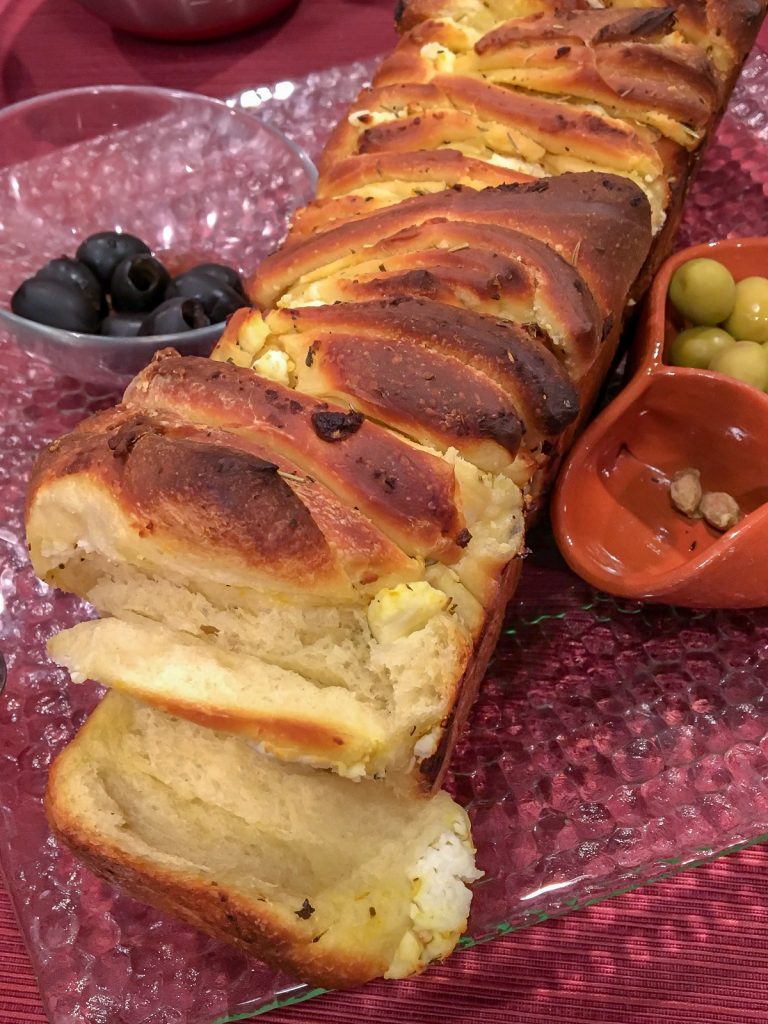
This last scenario is what happened to me the other day when my wife sent me a link to this YouTube video showing Aki making a nice looking Greek appetizer.  The bread is basically a pull-apart loaf that has olive oil and is stuffed with spices and Feta cheese. 

The following items will help you to make this bread.  If you end up purchasing any of these items, the site will get a small portion and encourage us to keep going!

  • Kitchenaid Stand Mixer with Clear Bowl
  • Set of mixing bowls
  • Hand Blender / Immersion Blender
  • Extra large bread loaf pan (long)

Knowing that we were having a dinner party at our house the next evening, I thought I’d give this bread a try and see if I could make it as good as that video made it seem.  I did some research and it seems to be a fairly unique bread too.  And to top it off this bread seemed pretty easy to make so after we fed the kids I got to work in the kitchen to mix the dough. 

Soft, Chewy, And Delicious

This bread turned out way better than I expected.  First off, the smell throughout the house was amazing thanks to all the good ingredients that went in to it.  I was also pleasantly surprised that the mustard sauce topping wasn’t at all overpowering like I thought it would be.  Guests kept commenting on how good this bread turned out, so I guess it’s a winner and a repeat contender for sure!

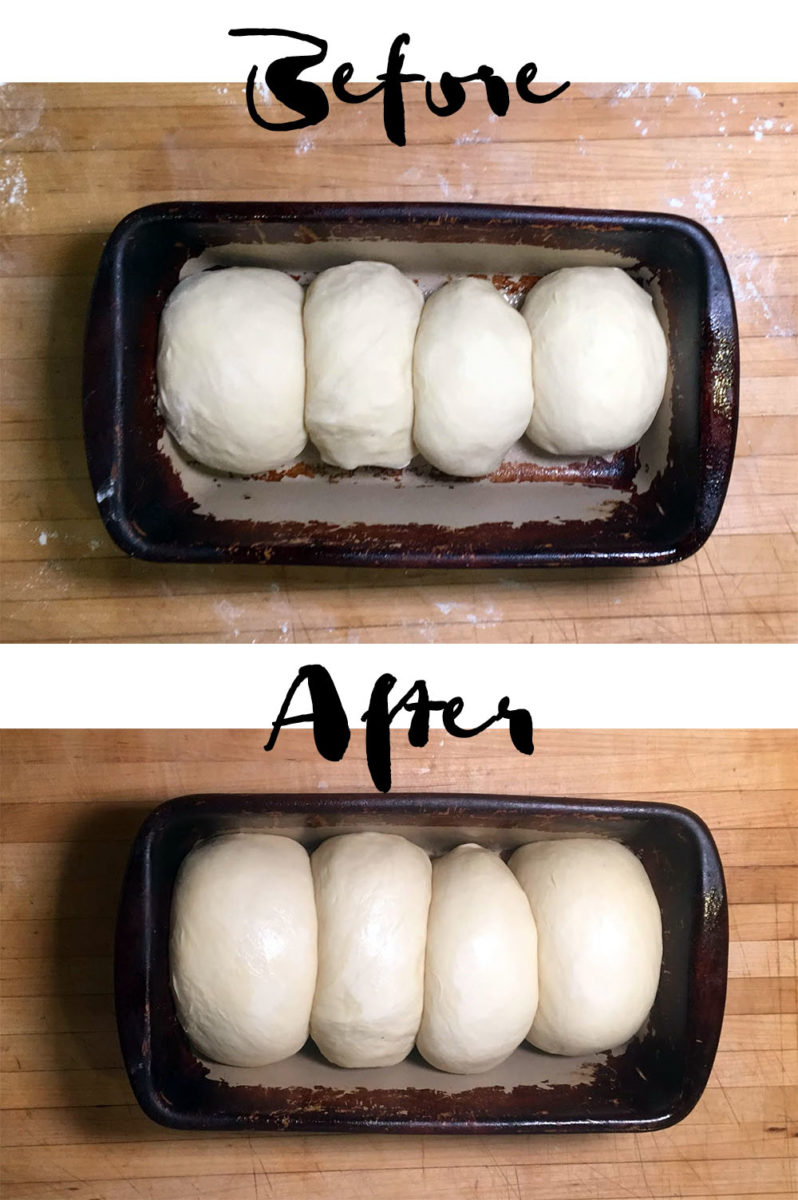
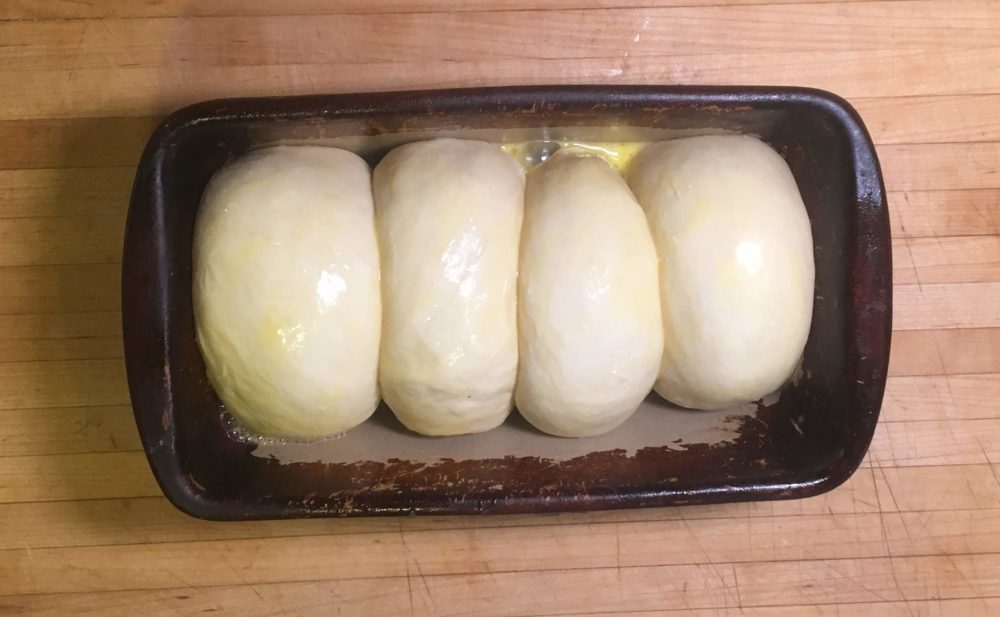
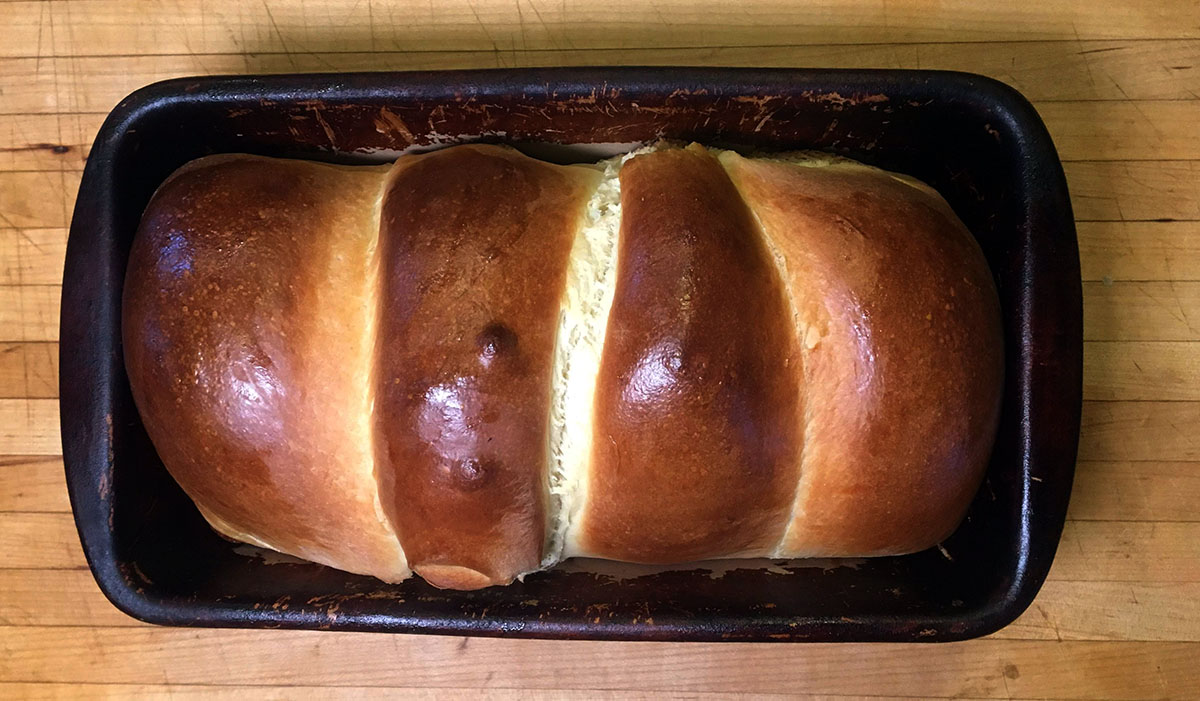
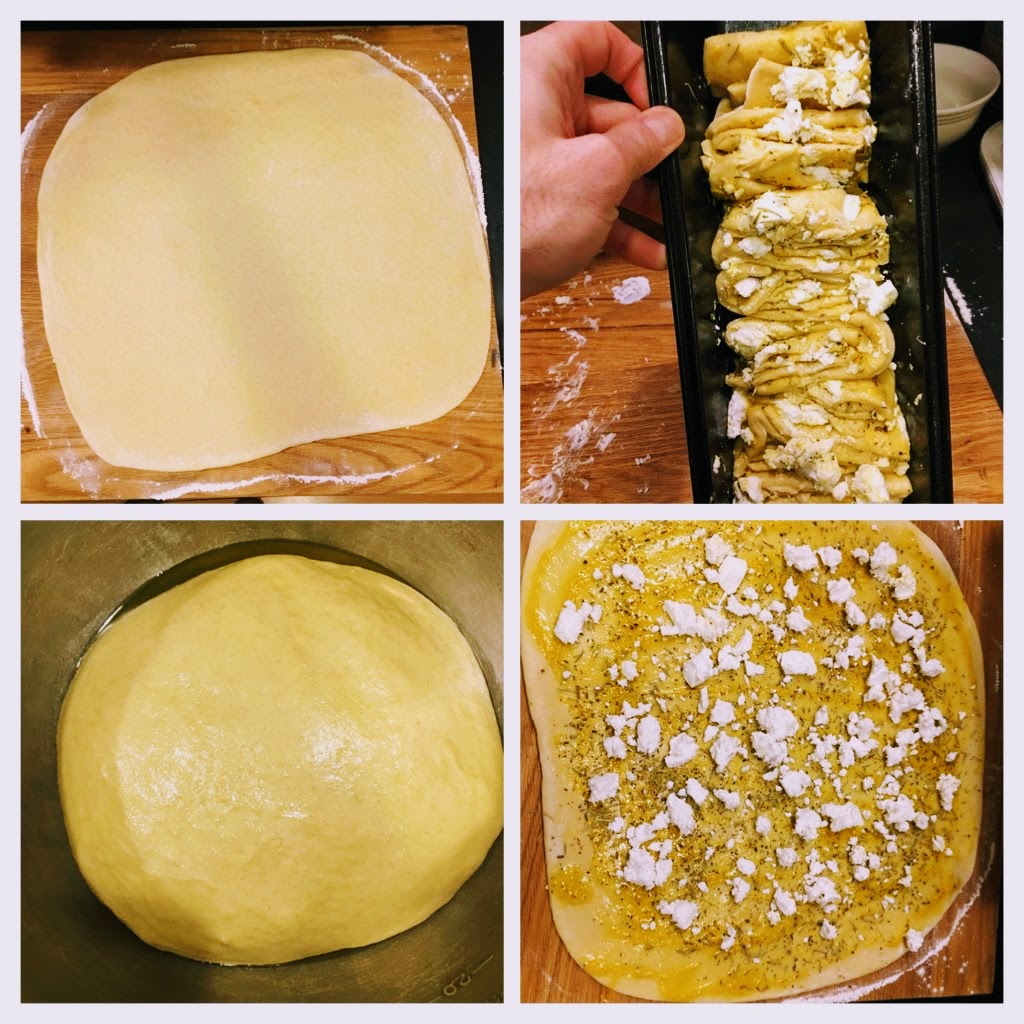
The overview of this Greek feta bread goes something like this. For the dough, all you need are these ingredients: Flour, water, salt, yeast, sugar, eggs, and olive oil.  You mix it all up and let it rise, then you roll it and fill it.  For the filling, you mix mustard and olive oil and spread it around the dough, then top with rosemary and oregano.  I didn’t have any fresh so I used some dried herbs we had in a jar.  Then you crumble and sprinkle the Feta cheese.  From there you cut it in to rows, lay them on top of one another, then you cut the rows in to pieces, then lay them one on top of the other in an oiled bread pan.  After an hour of rising you bake it and voila!

Here are the steps in a little more detail.

Allow the bread to rest for about half an hour after baking or it could fall apart unexpectedly! 

Have some olives and olive oil available for dipping and this will be the hit of your dinner party!

Filed Under: Bread, Bread Pictures, Bread Tutorials, Bread Videos Tagged With: bread, cheese bread, cheese pullapart bread, feta bread, feta cheese, feta cheese bread, greek bread, greek festive bread, greek holiday bread, greek pullapart bread, holiday bread, pullapart bread

1.11.18 By nick 2 Comments

Hokkaido Milk Bread

hokkaido milk bread

If you’re like me and like to look at bread photos for inspiration, you usually have a back log of breads that you drool over and want to try but for some reason or another haven’t yet had a chance to make.  Either because you kind of forget about it when it’s time to bake or because the recipe looks more complicated than the energy that you have for the project.

This milk bread is one of those for me.  It uses a Japanese method called tangzhong to make the final product extra fluffy because the result of the tangzhong is that you can make a bread which is more moist and therefore extra spongy.

This bread sounds mythical and exotic, doesn’t it?  Hokkaido is Japan’s second largest island and its capital is Sapporo, maker of the famous Japanese beer and host to the Olympics of 1972.  The Japanese milk bread became quite popular in the 19th century when the government encouraged citizens to use and drink local milk to support the farmers.  Creative bakers seized the opportunity and created this now famous bread from Hokkaido that is known for it’s supple texture and fluffy characteristics. 

The thing about this particular loaf of bread is how easy and versatile it really is to make.  The tangzhong takes about 3 minutes to make and the bread can be made in to a loaf like I made it or you could make it in to rolls and maybe even other exotic shapes.  The thing is that it’s really fun to work with and is a super fluffy bread.

The recipe

Hokkaido Milk Bread

This Japanese milk bread is soft, fluffy, and delicious!

Tangzhong

  • 3/4 Cup Milk
  • 1/4 Cup Flour

Dough

  • 500 Grams King Arthur AP Flour
  • 3 Tbsp Sugar
  • 1 Tbsp Salt
  • 15 Grams Milk Powder
  • 1 Tbsp yeast
  • 1/2 Stick Butter
  • 2 Whole Eggs
  • 1/2 Cup Milk

Egg Wash

  • 1 Whole Egg

Making the Tangzhong

This step is fairly simple but after you’re done, it’ll need about 15 minutes to cool so now would be a good time to warm up about 1/2 cup of milk and your yeast to let it wake and bloom.

In a pan over medium heat, add milk and flour.  Combine until the mixture thickens and becomes gelatinous.  Remove from heat and let cool.

The mixture should resemble a roux and should only take a minute or so to get done.

Making the Milk Bread Dough

In a stand mixer, cream the butter and sugar.

Add the dry ingredients, then the tangzhong, then the eggs. Mix at low speed until combined and start adding the milk a little at a time until it’s all incorporated.

As the dough begins to come together, slowly add the milk a little bit at a time and increase the speed of your mixer to the second speed. The dough should be fairly sticky but should clean the sides of the bowl as it’s being mixed.

I mixed mine for about 15 minutes before it was ready so don’t despair if it looks too wet!

Form the dough in to a ball and cover the bowl of the mixer with plastic to keep the dough moist and prevent a dry skin from developing on the dough.

Let it rest for about an hour or so until it doubles in size.

Once doubled, dump it out on to a floured surface and divide the dough in to 4 pieces.

Roll each piece in to a ball and put in a greased baking pan.  Cover lightly with plastic for another hour or so until the balls have risen nicely, roughly doubled again.

The Hokkaido bread dough balls before and after rising

Preheat your oven to 450˚F about halfway through.

Beat the eggs and wash over the dough before putting the loaf in the top rack of the oven to bake.

About 15 minutes in, turn the loaf and move to the lower rack.

At this time, lower the temperature to 400˚F.

20 minutes later, remove from the oven and let cool before enjoying!

hokkaido milk bread out of the oven fresh

For your reference, all of the equipment used for making this loaf are listed below.  I

  • KitchenAid Mixer
  • Bread Loaf Pan
  • King Arthur AP Flour
  • Plastic Wrap
  • Cutting Board
  • Bread Knife

Filed Under: Bread, Bread Pictures, Bread Tutorials Tagged With: bread tutorial, hokkaido, hokkaido milk bread, japanese bread, japanese milk bread, milk bread, tangzhong, tangzhong bread, tangzhong method, vietnamese bread

10.01.17 By nick Leave a Comment

7 Best Bread Pictures of 2016

As 2016 came to a close, the online bread community baked a lot of amazing things.  From yeasted to sourdough, flat to puffy, the world is filled with talented bakers.  Check out our pics for the 7 best bread pictures of 2016 and get inspired!


Homemade Blue Corn Tortillas
These aren’t your average homemade corn tortillas! They are scratch made with home grown blue corn! Top that!

source
[Read more…] about 7 Best Bread Pictures of 2016

Filed Under: Bread Pictures Tagged With: bread pics, bread pictures, breads of 2016, instagram bread, thefreshloaf

Copyright 2015-2021 Makebread.net