• Skip to primary navigation
  • Skip to main content
  • Skip to primary sidebar
  • Skip to footer
Make Bread

Make Bread

A bread blog for home bakers

  • Bread
  • Pizza

Bread

Cinnamon Morning Buns with Cardamom

24.04.19 By nick Leave a Comment

cinnamon rolls morning buns

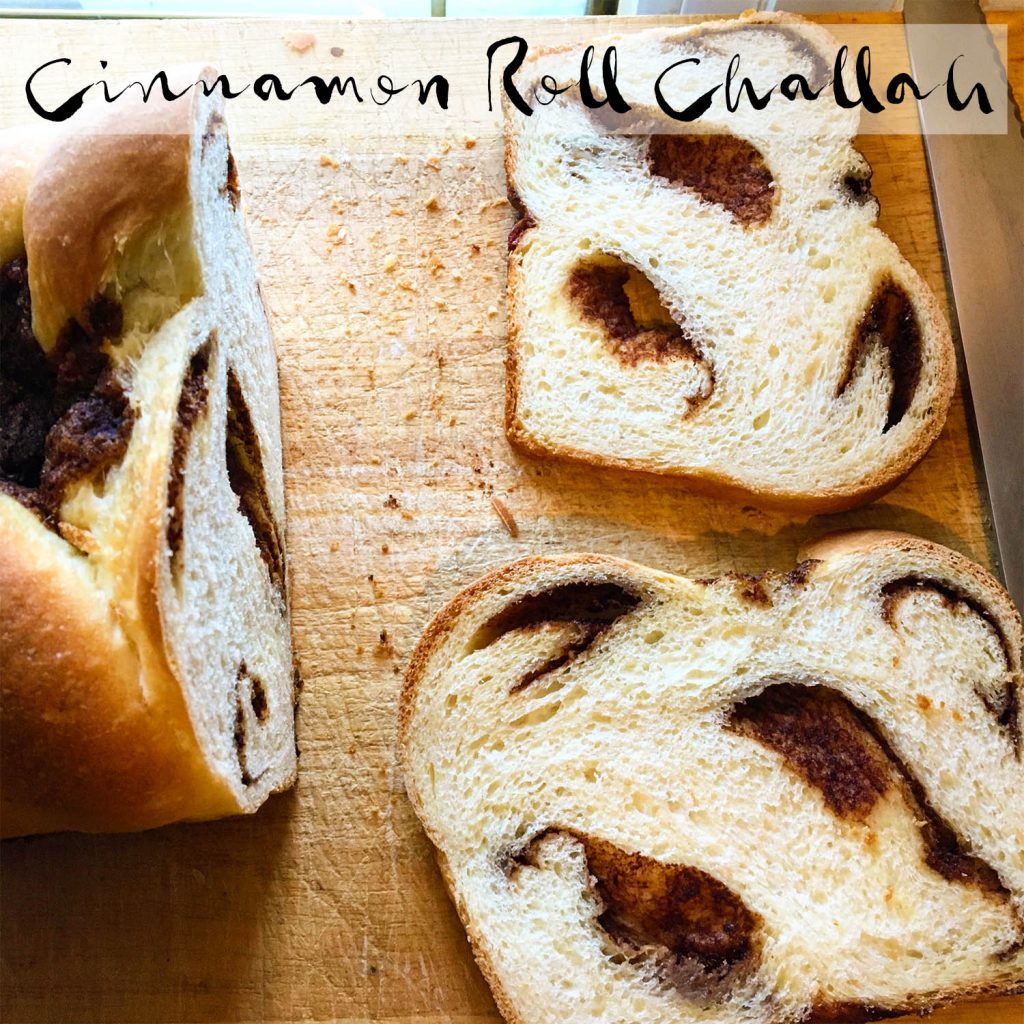
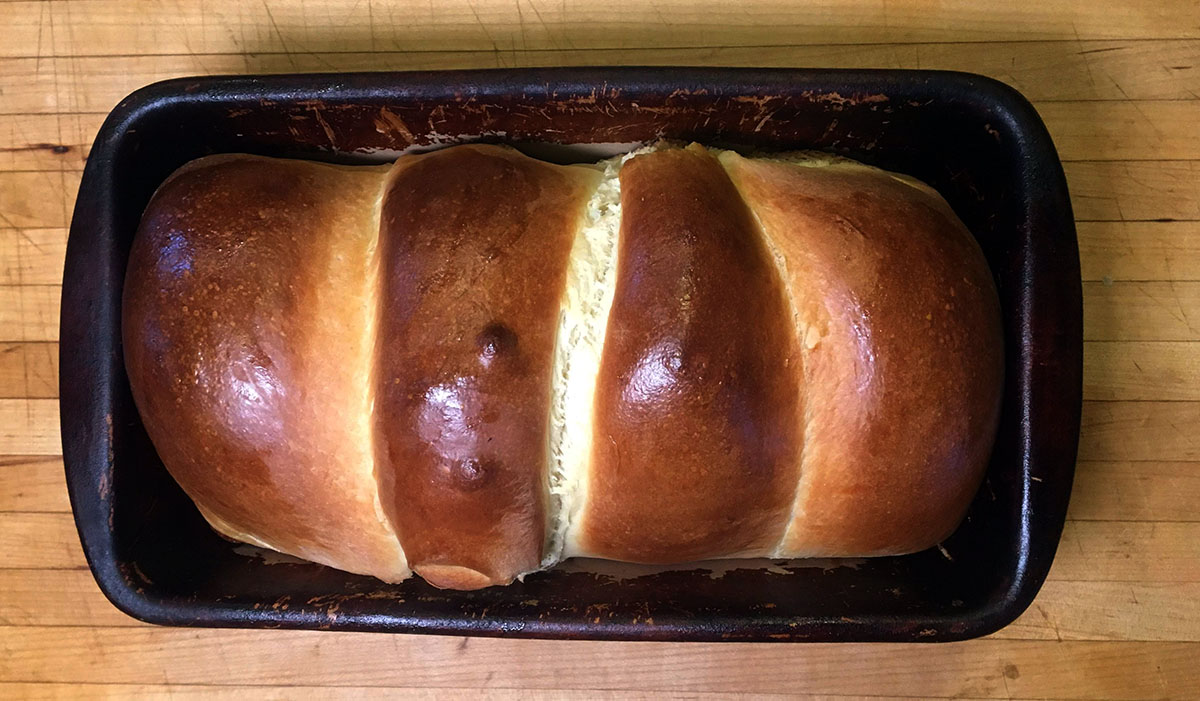
Some mornings call for something different, something special. This week, a particular morning was just one of those where the kids didn’t have school and I had the day off work. Wanting to make something special for the kiddos (or was it really for me?) I decided to try a creative spin on one of their favorites, the cinnamon roll and ended up making the Best Cinnamon Rolls Ever.

It seems like the cinnamon roll is almost perfect for any occasion and I set out to the pantry to get the ingredients for another batch of the rolls (which reminds me…I haven’t posted a recipe for those yet…but I’ll fix that soon!) when I remembered having read about these fancy looking Swedish Kanelbullar breakfast sweets. I did some searching and found a really good video on YouTube and bingo, that was my inspiration.

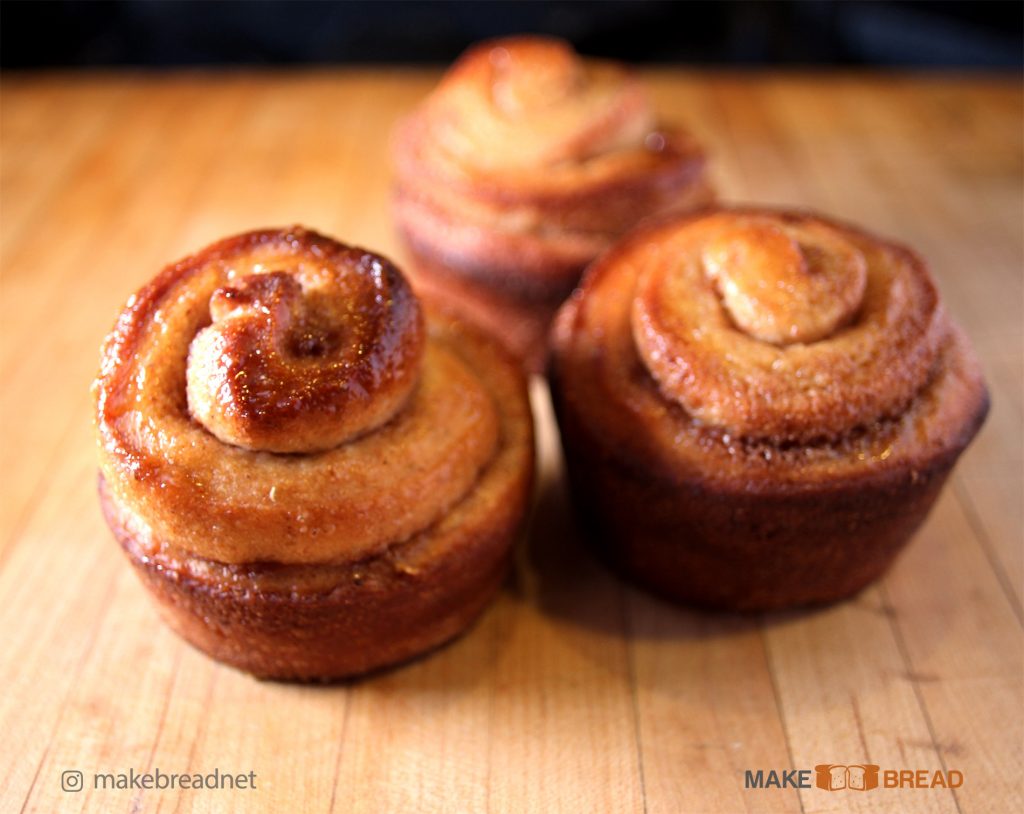
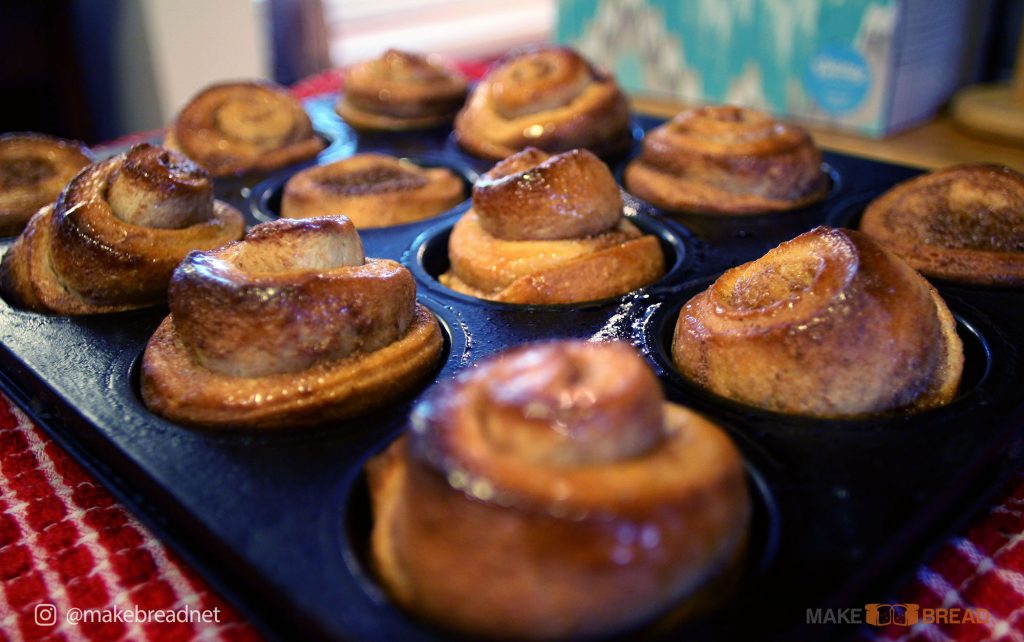
While these are neither true cinnamon rolls nor are they real Kanelbullars, I think they represent a happy balance between them. I imagine the Kanelbullar to be a little more dense than a cinnamon roll, so these are not quite as fluffy as a cinnamon roll. The cardamom that is used in the Kanelbullar knots was just the ticket for these and I bet they’ll be an amazing addition to regular cinnamon rolls. Not only were these morning buns pleasing to look at, they were also so aromatic! I loved the smell and even after a couple of days, when re-heating in the oven for a morning’s breakfast, the aroma was still amazing!

Suffice to say that I’ll be making these knots more often and will certainly be using freshly ground cardamom in more sweet enriched doughs in the future.

Cinnamon Morning Buns with Cardamom

These aromatic and delicious rolls are a mix between a Swedish Kanelbullar and a traditional Cinnamon Roll

Dough

  • 350 Grams Flour (All Purpose)
  • 150 Grams Flour (Whle Wheat)
  • 4 Medium Egg Yolks
  • 3 Medium Egg Whites
  • 50-100 Ml Warm Milk
  • 1 Stick Butter (Unsalted)
  • 1/2 Cup Sugar
  • 1 Tbsp Salt
  • 1 Tsp Freshly Ground Cardamom
  • 1 Packet Yeast

Filling

  • 2 Tbsp Butter (Softened/Room Temperature)
  • 1/2 Cup Brown Sugar
  • 1 Splash Milk

Shiny Finish

  • 1/4 Cup Simple Syrup

To make the Dough

  1. In one small bowl, soften the butter in the microwave.

  2. In a medium sized bowl (or the bowl of a stand mixer), add the flour, sugar, salt, cardamom, and yeast and gentry stir to combine.
  3. Separate the eggs and add the yolks and the whites to the bowl

  4. Add the butter to the party and start stirring to combine.

  5. Slowly add some of the warm milk to the mixture until the dough starts coming together.  You may not need much but this will depend on the size of your eggs.

  6. Knead the dough together until a smooth ball forms and it can clean the side of the bowl if using a stand mixer.

  7. Cover with a tea towel or plastic for about 90 minutes or until the dough has nearly doubled in size.

To Make the Filling

  1. Mix the butter, brown sugar, and milk in a small bowl to combine.  The end result should be a slightly runny filling.

To make the Morning Buns

  1. Move your dough to a lightly floured surface, and shape by hand in to a rough, rectangular shape.

  2. Using a rolling pin, roll the dough out until it is about 14 inches long and 8 inches wide, about 1/4 of an inch thick.

  3. Using an offset spatula, spoon, or other device, spread your filling over the entire dough, from edge to edge.

  4. Tightly roll your dough from the long side and cover with plastic.

  5. Put the dough in the fridge to chill for about 15 minutes to make it easier to cut.

  6. Cut your dough in to 12 even slices.

  7. Transfer the slices to a well oiled muffin tin.

  8. Cover loosely for about an hour.

  9. Transfer the tin to a preheated oven at 350˚F and bake for approximately 25 minutes, turning along to the way for even cooking.

Finishing Touches

  1. After you pull the muffin tin from the oven, brush the tops of the morning buns with simple syrup.

I’ve listed some equipment below that may help lead you to a successful bake! If you decide to buy anything directly from the links, the website will get a small percentage of your purchase and it encourages me to keep posting!

  • Kitchenaid Classic Stand Mixer
  • OXO Offset Spatula
  • Cuisinart Spice Grinder
  • OXO Rolling Pin
  • Nesting Mixing Bowls

Filed Under: Bread Tagged With: best cinnamon roll, best morning buns, breakfast food, breakfast treat, cardamom, cardamom cinnamon roll, cinnamon roll, cinnamon rolls, kanelbullar, morning buns, sweedish cinnamon roll

Review: Emile Henry Baguette Baker

3.04.19 By nick Leave a Comment

This one wasn’t terrible

The allure of a homemade baguette is enough to inspire and frustrate me. To no end, sometimes this simple bread drives me to madness while at the same time making me think that I sometimes just may know what I’m doing. To me, the simple breads can be the hardest to master and the baguette is my equivalent of Ahab’s White Whale. Sometimes I believe that a good result is imminent and then something happens to dash my hopes, like bread stuck to the pan or bread that didn’t get enough steam or a loaf that would be otherwise good except for the fact that it burnt. Ugh!!

Don’t get me wrong, most of my baguette experiments (and I’ll call them experiments until I can get them consistently right) taste good. On occasion they taste very good, but the overall appearance is lackluster. To me, a baguette has to be crispy and have a blistery crust with a golden hue, and the crumb of the bread should have enough holes to absorb the generous amount of butter or jam that ends up getting smeared over it but not so much as to lose its contents.

Of all of those things, the crust is probably my biggest problem due to my oven. I’ve talked about the beast before but, if you’re a first time reader here, I’ll rehash. The Beast is what I call my oven. It’s probably the sole reason my wife and I bought our house and it continues to amaze us that we actually get to use it. It’s a 60” commercial grade oven made by a company no longer in existence (or rebranded) called “US Range”. It features 6 burners and 2 ovens in addition to a very cool griddle that we use to hammer out some tasty treats for family and friends on special occasions. It’s not a very beautiful oven but it is pretty awesome. The one exception to its awesomeness may be the industrial build of The Beast. The oven is very drafty and the temperature is not very accurate. In one corner we may have 475˚F while on the other we may have 400˚F. It is also a mystery to me how but the oven chamber is drafty, which makes it very hard to steam breads in the oven.

Emile Henry Baguette Baker to the Rescue

You may recall the a while a go I reviewed the Emile Henry Bread Cloche. For the reasons noted in that post I love that cloche and with it, my breads come out beautiful every time. That’s why I was so excited to receive a demo of their beautiful baguette baking pan. Their beautiful baguette baking pan is “crafted from Emile Henry’s innovative refractory ceramic” which I must say is really quite nice. The baker and the cloche have a very nice feel to them and are actually lighter than they may look, yet they retain their heat very well. “The Emile Henry baguette pan assures delicious results and a beautiful presentation” which I do agree with.

After using the Emile Henry Baguette Baker several times, I have become used to how it behaves and know what I can expect to get from it given my skill set and limitations. I love the way the baguettes get baked thoroughly while at the same time having a nice crust on the outside and delicious flavor on the inside.

Emile Henry


Started in the mid 1800’s, the Emile Henry company has been producing quality earthenware for quite some time. Started in Burgundy, France by Jacques Henry, the Emile Henry brand is now present in over 50 countries. And still to this day, each piece of cookware is made by hand and if you look carefully at the bottom of your piece, you will see a stamp noting the artisan that made it for you!

Emile Henry doesn’t just make bread baking products. They have a whole catalog of housewares for your enjoyment. From plates and cups to oil dispensers and tajines, it seems like they make it all, including the Baguette Bread Baker dish.

The Baguette Baker

The Baguette Baker by Emile Henry is a covered clay tray with a lid that helps you bake good quality baguettes right in your home oven. Its tray has three wells so you can make up to 3 loaves at once. As I mentioned before, the baguette is a simple bread that is hard to get right, and the baguette baker is a great tool help you get it right.

Upon receiving the product, I didn’t even read the directions the first time I used it. And much to my surprise, I messed up and ended up with a misshapen lot!

First batch fail. I made the baguettes too fat and when I covered them with the lid, it pinched the sides of both loaves on the ends.

Disheartened but determined, I read the directions and suggestions, and when I used it I followed the directions to the T. Lo and behold, the breads came out just as advertised.

Second batch. Much better but still not not perfect!

Bread Baker Shortfalls

My biggest issue with the product is that that to successfully make bread in the pans, the breads end up being too small for my liking. They say that “you can bake up to 3 baguettes weighing up to 160g each” and in my opinion, they are quite small. I usually make my baguettes a little over 15 inches long and weighing about 320-360g, so these are less than half the size I’m used to. Another note is that the crust doesn’t really ever get very crispy. Since the breads rise in the pan and go directly in to the oven, you don’t really have the same effect on the crust as you do with the Emile Henry Bread Cloche or a cast iron pot where you’re loading a room temperature bread dough in to screaming container. While they claim that “the Baguette Baker maintains a perfect humidity rate during cooking”, I think that may depend on your oven and your mileage may vary so be prepared to add some extra steam to your oven if you want a crackly crust.

emile henry baguette baker
Emile Henry baguette baker

I have been using the baguette baker for about 3 months now and have made several batches of baguettes. While the bread loaves are quite small they are very satisfying. At a dinner party you can just slice the breads and put them on a nice cheese platter and nobody will now how big or small the breads were. However, the size of the baguette is my main issue with this device. Aside from that, I encourage you to snap one up on Amazon and give it a try! I think you’ll like it and it may just be the thing you need to take your baguettes from good to great!

Filed Under: Bread, Product Review Tagged With: baguette, baguette baking, bread steam, bread supplies, emile henry

Cinnamon Roll Challah Bread aka ChanniyumRoll

21.01.19 By nick Leave a Comment

cinnamon roll challah title image

A few weeks ago I was invited to participate in the National Festival of Breads baking contest that’s put on by the Kansas Wheat association and sponsored by King Arthur Flour and Red Star Yeast. I’ve never been invited to one of these things before so I was a little apprehensive about entering, but decided to give it a go.

After thinking long and hard about what type of bread I should make as my entry in to this contest, I decided to keep things simple but creative at the same time. I thought about the kinds of breads my family and friends enjoy, I thought about the foods that inspire me. My conclusion was that breakfast is my favorite meal to share with the kids, so taking some encouragement from them and inspiration from one of my favorite instagram superheroes (she has super challah powers!), I’m entering what is a blend of classic cinnamon roll and challah bread, which results in what I think is a delicious treat the whole family can enjoy.

Using King Arthur All-Purpose flour and Red Star Yeast for this recipe were no brainers. King Arthur’s flours produce the soft dough you want in a recipe like this and the Red Star Yeast provides an amazing rise for a super pillowy chew that you want in a cinnamon roll.

So, without further ado here is my entry in to this Festival. Making it is a very straight forward process and I’m sure you’ll have wonderful results at home! If you are new to baking, don’t be intimidated. This bread is simple to make, the dough is very forgiving, and you’ll enjoy making this for sure. I have listed all of the tools you may need to make this bread below the recipe too.

Helpful tools for making this bread

  • Stand Mixer
  • King Arthur Flour
  • Red Star Yeast
  • Bread baking pan
  • Large cutting board
  • Bread knife
  • Bread dough scraper

Filed Under: Bread, Bread Tutorials Tagged With: baking at home, bread baking, bread contest, bread making, challah, cinnamon roll, experimental bread, home baker, home baking, king arthur flour, make bread, red star yeast

Greek Feta Pull Apart Bread – Step By Step

16.12.18 By nick 1 Comment

This pullapart bread is so easy to make!  Once in a while you get a little creative in the kitchen.  Either because you’re short on time and just make things up as you go or because you don’t have the right ingredients so you just toss things in and hope things work out. But once in a while someone sends you a recipe tip that stirs up the imagination and you just go for it.

greek pull apart bread tutorial collage

This last scenario is what happened to me the other day when my wife sent me a link to this YouTube video showing Aki making a nice looking Greek appetizer.  The bread is basically a pull-apart loaf that has olive oil and is stuffed with spices and Feta cheese. 

The following items will help you to make this bread.  If you end up purchasing any of these items, the site will get a small portion and encourage us to keep going!

  • Kitchenaid Stand Mixer with Clear Bowl
  • Set of mixing bowls
  • Hand Blender / Immersion Blender
  • Extra large bread loaf pan (long)

Knowing that we were having a dinner party at our house the next evening, I thought I’d give this bread a try and see if I could make it as good as that video made it seem.  I did some research and it seems to be a fairly unique bread too.  And to top it off this bread seemed pretty easy to make so after we fed the kids I got to work in the kitchen to mix the dough. 

Soft, Chewy, And Delicious

This bread turned out way better than I expected.  First off, the smell throughout the house was amazing thanks to all the good ingredients that went in to it.  I was also pleasantly surprised that the mustard sauce topping wasn’t at all overpowering like I thought it would be.  Guests kept commenting on how good this bread turned out, so I guess it’s a winner and a repeat contender for sure!

The overview of this Greek feta bread goes something like this. For the dough, all you need are these ingredients: Flour, water, salt, yeast, sugar, eggs, and olive oil.  You mix it all up and let it rise, then you roll it and fill it.  For the filling, you mix mustard and olive oil and spread it around the dough, then top with rosemary and oregano.  I didn’t have any fresh so I used some dried herbs we had in a jar.  Then you crumble and sprinkle the Feta cheese.  From there you cut it in to rows, lay them on top of one another, then you cut the rows in to pieces, then lay them one on top of the other in an oiled bread pan.  After an hour of rising you bake it and voila!

Here are the steps in a little more detail.

Allow the bread to rest for about half an hour after baking or it could fall apart unexpectedly! 

Have some olives and olive oil available for dipping and this will be the hit of your dinner party!

Filed Under: Bread, Bread Pictures, Bread Tutorials, Bread Videos Tagged With: bread, cheese bread, cheese pullapart bread, feta bread, feta cheese, feta cheese bread, greek bread, greek festive bread, greek holiday bread, greek pullapart bread, holiday bread, pullapart bread

Hokkaido Milk Bread

1.11.18 By nick 2 Comments

hokkaido milk bread

If you’re like me and like to look at bread photos for inspiration, you usually have a back log of breads that you drool over and want to try but for some reason or another haven’t yet had a chance to make.  Either because you kind of forget about it when it’s time to bake or because the recipe looks more complicated than the energy that you have for the project.

This milk bread is one of those for me.  It uses a Japanese method called tangzhong to make the final product extra fluffy because the result of the tangzhong is that you can make a bread which is more moist and therefore extra spongy.

This bread sounds mythical and exotic, doesn’t it?  Hokkaido is Japan’s second largest island and its capital is Sapporo, maker of the famous Japanese beer and host to the Olympics of 1972.  The Japanese milk bread became quite popular in the 19th century when the government encouraged citizens to use and drink local milk to support the farmers.  Creative bakers seized the opportunity and created this now famous bread from Hokkaido that is known for it’s supple texture and fluffy characteristics. 

The thing about this particular loaf of bread is how easy and versatile it really is to make.  The tangzhong takes about 3 minutes to make and the bread can be made in to a loaf like I made it or you could make it in to rolls and maybe even other exotic shapes.  The thing is that it’s really fun to work with and is a super fluffy bread.

The recipe

Hokkaido Milk Bread

This Japanese milk bread is soft, fluffy, and delicious!

Tangzhong

  • 3/4 Cup Milk
  • 1/4 Cup Flour

Dough

  • 500 Grams King Arthur AP Flour
  • 3 Tbsp Sugar
  • 1 Tbsp Salt
  • 15 Grams Milk Powder
  • 1 Tbsp yeast
  • 1/2 Stick Butter
  • 2 Whole Eggs
  • 1/2 Cup Milk

Egg Wash

  • 1 Whole Egg

Making the Tangzhong

This step is fairly simple but after you’re done, it’ll need about 15 minutes to cool so now would be a good time to warm up about 1/2 cup of milk and your yeast to let it wake and bloom.

In a pan over medium heat, add milk and flour.  Combine until the mixture thickens and becomes gelatinous.  Remove from heat and let cool.

The mixture should resemble a roux and should only take a minute or so to get done.

Making the Milk Bread Dough

In a stand mixer, cream the butter and sugar.

Add the dry ingredients, then the tangzhong, then the eggs. Mix at low speed until combined and start adding the milk a little at a time until it’s all incorporated.

As the dough begins to come together, slowly add the milk a little bit at a time and increase the speed of your mixer to the second speed. The dough should be fairly sticky but should clean the sides of the bowl as it’s being mixed.

I mixed mine for about 15 minutes before it was ready so don’t despair if it looks too wet!

Form the dough in to a ball and cover the bowl of the mixer with plastic to keep the dough moist and prevent a dry skin from developing on the dough.

Let it rest for about an hour or so until it doubles in size.

Once doubled, dump it out on to a floured surface and divide the dough in to 4 pieces.

Roll each piece in to a ball and put in a greased baking pan.  Cover lightly with plastic for another hour or so until the balls have risen nicely, roughly doubled again.

The Hokkaido bread dough balls before and after rising

Preheat your oven to 450˚F about halfway through.

Beat the eggs and wash over the dough before putting the loaf in the top rack of the oven to bake.

About 15 minutes in, turn the loaf and move to the lower rack.

At this time, lower the temperature to 400˚F.

20 minutes later, remove from the oven and let cool before enjoying!

hokkaido milk bread out of the oven fresh

For your reference, all of the equipment used for making this loaf are listed below.  I

  • KitchenAid Mixer
  • Bread Loaf Pan
  • King Arthur AP Flour
  • Plastic Wrap
  • Cutting Board
  • Bread Knife

Filed Under: Bread, Bread Pictures, Bread Tutorials Tagged With: bread tutorial, hokkaido, hokkaido milk bread, japanese bread, japanese milk bread, milk bread, tangzhong, tangzhong bread, tangzhong method, vietnamese bread

Bread with Yeasted Water

23.10.18 By nick Leave a Comment

There are many ways to make bread.  From slow sourdough breads that can take a few days from the time you mix to the time you bake to biscuits that can be mixed and cooked within a few moments, the variety of leavening agents available for the home baker are quite diverse.

By far the most popular method that folks use to bake bread at home is with store bought yeast.  Just cut open the little bag and add to your mixing bowl and the dough will “double in size” in fairly short order.  From there the baker shapes the dough, lets it rest for a little longer, and off it goes in to the oven for a tasty bread in half an hour.

One of the lesser known ways of making bread is by using yeasted water.  Yeasted water is the result of adding something that has a little bit of fruit to a jar, and topping it off with water before sealing the jar and waiting for a few days.  I first read about this baking method from this post a few years ago.  Being the curious cat that I am, I researched a bit and found very little online at the time but decided to take the post’s words as truth and baked one of my first breads with “leavened water” that I made from plums.  You can read the post and get a glimpse of the process but I’ll detail it here again for you.  One thing that I think I omitted to say on the original post is that you should make your jar as full of water as possible in order to leave as much air as possible out of the jar.  The air could cause your infusion to grow mold.  This happened to me once and am sure is fairly common given that you want to generally keep these infusions in a warm area for a while.

So since fall is here it means that our local fruit farm had an abundance of prune plums, which are by far my favorite type of plum, so we bought an unnecessarily large amount.  We sure had our fill for the season!  I also made some plum jam and decided to make this infused yeasted water bread again with the last few plums of the year.  You certainly don’t need to use plums for this, so look around your kitchen and get creative!  You can use just about any fruit you want to use.  Apples and raisins are other good fruits to use but use your imagination and give it a go.

The first step is to wash you jar and your plum really well.  From there all you have to do is put the plums in the jar and fill the jar to the top with water before tightening the lid.  Now place your creation somewhere it can be left alone for a few days, but nowhere you could forget about because if you do, the gas that gets built up in the jar could cause the jar to explode and thus remind you of where you had left it!

Check in on your infusion once a day so you can observe how things change but the you’ll know the mixture is ready when there are bubbles at the top of the jar.

If you are not ready to bake when the infusion is ready, you can put it in the fridge for a few days but note that this will increase the amount of time it takes for the bread to proof and may require a little bit of “spiking” with regular yeast.  I put my infusion in the fridge for a couple of days this time and didn’t notice much of a slowdown but your mileage may vary.

When you do decide to bake, substitute the water in your formula for your infused yeast water and don’t add any yeast.  Mix it all together and watch the magic happen.  If after a few hours you don’t see any growth in your dough or it’s really slow, don’t hesitate to add a little bit of yeast to your dough and knead it again for a bit to incorporate everything.  There’s no shame in that, you’ll still get the subtle aroma of the fruit and your results will be great!

Yeasted Plum Water Bread Recipe

  • 500 grams King Arthur All-Purpose flour
  • 335 ml yeasted plum water
  • 22 grams salt
  • 22 grams sugar

In a medium bowl add your flour, salt, and sugar then add the water.  Mix to combine and cover.  Using more or less a sourdough method, check in on the dough after half and hour and do a stretch and fold.  Do a stretch and fold every half hour or so if your dough is slow to rise.  If it’s rising quickly just one of two folds until it can pass the windowpane test easily will suffice. 

Once it’s grown and nearly doubled, turn on to a floured surface and pre-shape your loaf to your desired final shape.  Put in to a proofing basket and proof for an hour or so at room temperature or in the fridge overnight.

Pre-heat your oven to 500˚F and once ready, score your loaf and load it in the oven before turning the oven down to 450˚F.  If you’re using a cloche like I did, bake it with the lid on for 15 minutes and finish baking without the lid, another 15 minutes or so.

Remove the loaf from the oven and let cool before enjoying.

Check out the full video of the process below.  If you have any questions leave a comment on YouTube and make sure to subscribe to the channel!

All of the gear that I used to make the bread is listed below:

  • Glass jars with lids
  • Mixing Bowls
  • Emile Henry Bread Cloche
  • King Arthur AP Flour
  • Bread Proofing Basket
  • Lame (bread slashing razor)

Filed Under: Bread, Bread Tutorials, Bread Videos Tagged With: baking bread, bread, bread tutorial, breaking bread, infused water, yeast water, yeasted bread, yeasted water

  • Go to page 1
  • Go to page 2
  • Go to page 3
  • Go to Next Page »

Primary Sidebar

My Story

My name is Nick, an amateur bread baker living in Pennsylvania. I have been making bread since my neighbor in grad school showed me that you could make great bread at home and have fun doing it. Since then I've been hooked and am always looking for ways to improve my baking. Find out more about me and let's get baking together!

Recent Breads

  • Classic French Bread Recipe: Pain Ordinaire Careme
  • Cinnamon Morning Buns with Cardamom
  • Review: Emile Henry Baguette Baker
  • Cinnamon Roll Challah Bread aka ChanniyumRoll
  • Greek Feta Pull Apart Bread – Step By Step
  • Hokkaido Milk Bread
  • Bread with Yeasted Water
  • Everyday Sourdough Bread
  • My First Attempt at Einkorn
  • How to revive a dead sourdough starter

Footer

Search The Archives

Archives

From the Blog

  • Classic French Bread Recipe: Pain Ordinaire Careme
  • Cinnamon Morning Buns with Cardamom
  • Review: Emile Henry Baguette Baker
  • Cinnamon Roll Challah Bread aka ChanniyumRoll
  • Greek Feta Pull Apart Bread – Step By Step

Copyright 2015-2021 Makebread.net