• Skip to main content

Make Bread

A bread blog for home bakers

  • Bread
  • Pizza

sourdough

29.04.16 By nick Leave a Comment

Reminder: Don’t Underproof Your Loaves!

failed tartine bread

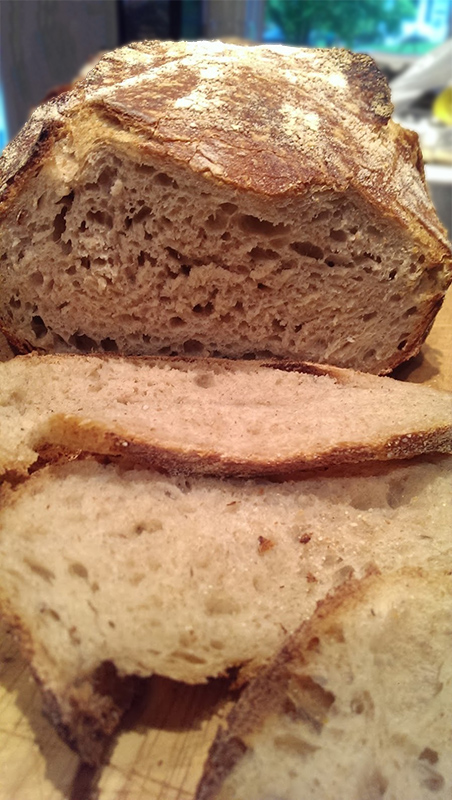
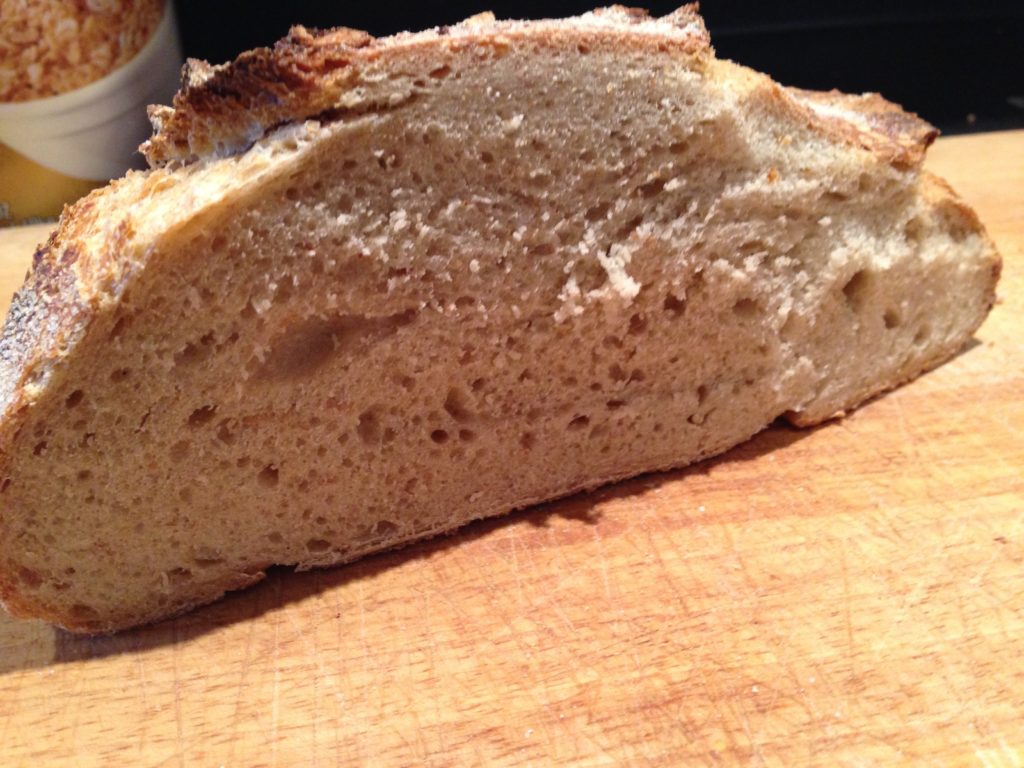
One of the things I want to do on this site is to share with you the (many) mistakes that I make as a home baker. Not all breads are beautiful, not all loaves are perfect. For one reason or another, I often mess up and want to use this space to share with you pitfalls you will likely face when baking in your own kitchen.

[Read more…] about Reminder: Don’t Underproof Your Loaves!

Filed Under: Bread, Bread Tutorials Tagged With: baking, bread, bread fail, bread tutorial, failed tartine, failure, homemade bread, sourdough, tartine country bread, wild yeast

23.03.16 By nick 1 Comment

24 Hour Ciabatta

ciabatta

Ciabatta is one of those breads that go well with just about anything. It can stand up on its own or, as is most commonly done, be served as the vehicle for olive oil as a light hors d’oeuvre. As ubiquitous as Ciabatta is at restaurants, believe it or not it is a relatively new type of bread. Developed in 1976 by a baker in Verona as a response to French baguettes, the Ciabatta is an elongated flat loaf characterized by its many holes and light texture. It was only brought to the US in 1987![1]


[Read more…] about 24 Hour Ciabatta

Filed Under: Bread, Bread Tutorials Tagged With: bread baking, bread tutorial, ciabatta, home made bread, pao caseiro, realbread, sourdough, sourdough ciabatta, wild yeast

29.02.16 By nick Leave a Comment

Semolina Sourdough

semolina-crumbWhen I was first introduced to semolina bread, I was in awe. I usually thought of semolina in terms of pasta but after trying it in bread form, I was hooked. The bread had a light golden color and a soft, fine crumb that craved to be toasted and buttered. Whenever I get my hands on semolina flour I always look forward to making a loaf that stands up to that vision.

This past week I went to a local grain store and purchased a few bags of different flours. Some bread flour, some wheat flour, and gladly some semolina flour. I was a little dismayed when the vendor wasn’t sure where the flours came from (I was hoping for some local flour milled in Pennsylvania) but nevertheless, home I went.

I fed my sourdough starter and adjusted a recipe from Jeffrey Hamelman’s “Bread” book for a semolina sourdough loaf.  The recipe yields two loaves and is quite easy to make.  If this is your first time using semolina, you’ll be surprised by how it transforms from granular flour to soft dough.

semolina-buttered


[Read more…] about Semolina Sourdough

Filed Under: Bread Tutorials Tagged With: au levain, baking, bread, cold proof, delicious, homemade bread, homemade semolina, levain, semolina, semolina au levain, semolina sourdough, sourdough

2.10.15 By nick Leave a Comment

Sourdough Challah

Rounded Challah Loaf

Sometime between the end of August and now, things got really busy and it seems like I entered a time warp.  Since doing my last post I visited family in Boston, got bird poop on my camera, and made some really nice sourdough bread.  The highlight of the baking were the sourdough challah loaves and the rounded ones were by far the prettiest.  Since we eat with our eyes first, I guess they were the tastiest too!

Around this time of year I always end up baking quite a bit of challah.  They’re delicious, for one, but also very versatile.  French toast challah, ham and cheese challah, sour cream and challah, tea and challah, challah and honey, challah challah challah challah!  It’s one of my favorites to make and everyone loves to eat it so I decided to try my hand at a 100% sourdough challah loaf.

For this recipe the key ingredient was time.  From making sure the starter was good and ready to letting the loaves proof in the fridge before baking, the time spent in waiting was well worth the result.  These turned out with a nice sour flavor, slightly sweet, fairly low on the richness scale, and perfect for any occasion from cheese plates to breakfast main item.

A note on the starter:  As I mentioned, getting the starter good and ready was key.  I started 3 days in advance feeding the starter and waking it back up as I keep mine in the fridge during the ‘down’ times I don’t bake.  I fed my starter at first with 25g water and 25g flour, then 24 hours later with 50g flour and 50g water, then 12 hours later with 75g flour and 60g flour, and then one more final feeding 8 hours before using with 100g flour and 65g water.  This is roughly a 75% hydration starter and it worked very well for this bake.

The final formula looked like this:

  • 300g starter
  • 400-450g water
  • 950g flour
  • 60g sugar
  • 1 whole egg + 2 yolks
  • 50g oil
  • 20g salt

For the pre-bake wash, use one egg yolk and not quite all of the white + a little water to brush on your loaves.

[ezcol_1third]divided dough[/ezcol_1third] [ezcol_1third]challah strands[/ezcol_1third] [ezcol_1third_end]Challah loaf[/ezcol_1third_end]

Method

Mix all of the ingredients minus the salt and autolyse for 30 minutes.  Add the salt and mix until fully incorporated.  Let the dough bulk ferment and stretch & fold the mass every 30 minutes for the first 2 hours.  Let it ferment for another two hours in peace.

Divide the dough in to balls weighing roughly the same amount.  The number of balls and the weight will depend on how many strands you want.  For my 3 rounded loaves of 4 strands, I used 12 balls of about 125g each.  Cover in plastic and allow them to relax for 20-30 minutes.

Roll our the strands and braid your bread.  Place the bread in a baking sheet lined with parchment paper and cover with plastic.

Put in the fridge overnight (I had some scheduling conflicts so mine ended up in the ice box for about 14 hours…no adverse effects noticed).

Let them proof at room temp once again for an hour or two and pre-heat your oven accordingly to 375˚F.  Brush the loaves with the egg wash and sprinkle seeds, sugar, salt, or other toppings as needed and bake for about 35 minutes, turning the loaves half way during the bake.

Let cool and enjoy!

Filed Under: Bread Tutorials Tagged With: baking, bread, challah, cheese tray breads, recipe, sourdough, wild yeast

11.08.15 By nick Leave a Comment

Pain Au Levain with Whole Wheat

bread-finalWhen it comes to making bread, one of the things I really enjoy is trying to make it LOOK good as much as I enjoy making it taste good.  This bread is packed with a little bit of rye flour, a little bit more whole wheat flour, and the rest is AP or bread flour.  Paired with fairly low hydration, this combination of ingredients make a nice looking, easy to shape delicious loaf.

Jeffrey Hamelman is somewhat of a superstar these days.  Not only is he the man behind the bakery at King Arthur’s home bakery his book is also well reviewed and award winning.  The recipes in this book are available in three versions, one for commercial quantities in metric, another commercial size batch in imperial, and one for the home baker.  As a home baker I just take the commercial quantity and divide by 100 to get my weights in grams.

This recipe starts with building a stiff levain with rye and whole wheat, which is then added to your final dough.  This bread is a little less hydrated than most and I deviated a bit from the recipe by adding about 20g more water than what the book calls for.  My loaves ended up being crusty with a nice soft interior and good crumb.

[ezcol_1half]bread-levain[/ezcol_1half] [ezcol_1half_end]bread-shaped[/ezcol_1half_end]

This recipe is based on Jeffrey Hamelman’s “Bread – A Baker’s Book of Techniques and Recipes”

Levain:

  • 145g AP flour
  • 10g rye flour
  • 90g water
  • 30g mature starter

Final Build:

  • 605g AP flour
  • 200g whole wheat
  • 40g rye flour
  • 580g water
  • 18g salt
  • 250g levain
  1. Mix the levain and let it mature for 8-12 hours.
  2. When the levain is ready, mix the flours and add most of the water, reserving some for later.  Mix and let autolyse for 15 minutes.
  3. Break up the levain and add it to the mixture, mix and knead until well incorporated. Add the remainder of the water.
  4. Add salt and knead until well incorporated.
  5. Add a little more water if desired and knead until fully incorporated.
  6. Transfer the dough to a bowl and cover.  After 30 minutes stretch and fold the dough.  Repeat this two more times at 30 minute intervals.
  7. After an hour and a half of rest and stretching and folding, let the dough proof for another hour and a half to 3 hours.
  8. Divide the dough and pre-shape, then shape as desired.
  9. Proof for an hour and a half at room temperature or up to 12 hours in the fridge.
  10. Add your baking stone to the oven and pre-heat the oven to 450˚F
  11. When the oven is ready, bake under steam for 15 minutes.  Rotate after 15 minutes and let bake another 20-30 minutes until done.

bread-final2

submitted to YeastSpotting

Filed Under: Bread Tutorials Tagged With: baking, bread, cheese tray breads, le cloche, recipe, rye bread tutorial, sourdough, whole wheat, wild yeast

  • « Go to Previous Page
  • Go to page 1
  • Go to page 2
  • Go to page 3
  • Go to Next Page »

Copyright 2015-2021 Makebread.net